
It is 9 a.m. The boxes are stacked in the hallway, the old cabinets are gone, and the bare wall looks bigger than you remember. That moment is a mix of excitement and a small knot in your stomach, and both are normal.
Learning how to install kitchen cabinets is a job a careful DIYer can handle, but it is not a quick one. The Home Depot rates wall cabinet installation as an advanced project and estimates it takes over one day. The good news is that the method is the same in every kitchen: find a reference line, find the studs, fasten into them, and keep checking level.
This guide walks you through it in order. Take it one stage at a time. You do not have to finish everything in one sitting.
Quick answer
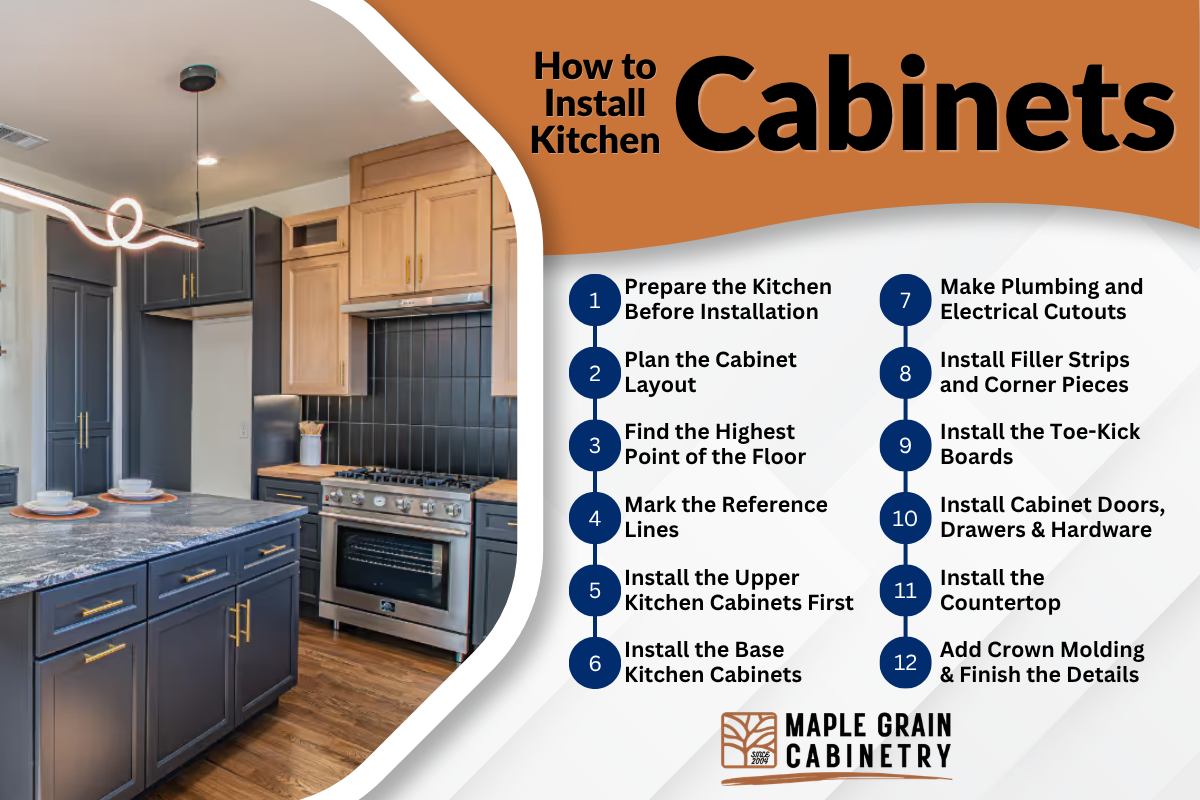
Here is how to install kitchen cabinets in short form. Hang the wall cabinets first, then the base cabinets. Start from the highest point of the floor, mark a level line for the top of the base cabinets at 34.5 inches and the bottom of the wall cabinets at 54 inches, find the studs, and screw every cabinet into them. Clamp neighbors together, shim until each one is plumb and level, then add filler strips, doors and hardware. Most guides say to bring a helper. Checked November 2026, and your cabinet maker’s instructions come first.
Is this a DIY job for you?
Be honest about three things first: your time, your help, and your patience for small adjustments.
- Time. Plan on more than one day, according to The Home Depot. A first-timer should add buffer.
- Help. Bob Vila says lifting cabinets alone risks muscle strain and crushing injuries if one falls. Another Bob Vila guide recommends at least one other person to support each wall cabinet while you fasten it.
- Skill. You need to be comfortable with a drill and a level. Odd angles or a bowed wall may call for a pro.
Cost is part of the choice too. A later section covers what installers charge, and the guide on what the cabinets themselves cost helps you see the whole budget. If you want an expert eye on a tricky plan, you can talk through a tricky layout before you start.

Tools and materials checklist
This list draws on The Home Depot, This Old House, Bob Vila and Lowe’s. A missing clamp or shim at 4 p.m. is no fun.
- ☐Cordless drill and bits, including a countersink or taper bit
- ☐Level (the guides name laser levels and long levels of 4 to 6 feet), tape measure and pencil
- ☐Stud finder, painter’s tape and a chalk line
- ☐Clamps, wood shims, filler strips and a compass for scribing
- ☐Washer-head cabinet mounting screws, plus shorter screws to join cabinets
- ☐A 1×3 or 1×4 board for a temporary support rail (a ledger)
- ☐Gloves, safety glasses, sturdy shoes and a helper

Prepare the room and the cabinets
A little preparation prevents most of the problems people run into on install day.
- Time the install. HomeTips says to install cabinets after the rough wiring and plumbing are done and before the finish flooring goes in.
- Unpack and count. The same guide says to confirm every component is there and to label any part you remove. If you ordered through a retailer, read the delivery terms so you know what to check and by when. Keep the return policy handy in case something arrives damaged.
- Check the walls. HomeTips suggests a long straightedge to find bumps and voids, and Bob Vila suggests a 4-foot level to check for plumb. Mark the problem spots.
- Remove doors, drawers and hardware. The Home Depot and Bob Vila both say this makes cabinets lighter and protects the parts.
- Confirm your measurements. HomeTips says to check cabinet sizes against the room before you start. If you have not measured carefully, confirm the room’s measurements before anything goes on the wall.
Ready-to-assemble boxes need one more step. They arrive flat, so you build them first. If you would rather skip that, factory-assembled cabinets arrive ready to hang. Whichever you pick, follow the instructions that came with your cabinets. If they differ from this guide, theirs win.
Small first action
Lay every box out in the order of your plan and label it with painter’s tape (for example, “W1” for the first wall cabinet). It takes ten minutes and saves you from hunting for the corner unit later.
Mark your layout lines
Everything hangs from a reference line, so spend your best attention here. The guides agree on the approach: start from the highest point of the floor, because floors are rarely flat.
- Find the high point. Bob Vila says to mark a reference line across the wall, then measure from it to the floor in several places. The shortest measurement is the highest floor point.
- Mark the base cabinet line. For standard-size cabinets, measure 34.5 inches up from that high point and draw a level line, according to Bob Vila and HomeTips.
- Mark the wall cabinet line. Measure up another 19.5 inches from the base line. That puts the bottom edge of the wall cabinets at 54 inches, the same height The Home Depot and Lowe’s give.
- Mark appliances and fixtures. Note where the refrigerator, range and hood go so cabinet runs line up with them.
| Measurement | Figure in the guides | Source |
|---|---|---|
| Top of base cabinets, from the highest floor point | 34.5 inches | Bob Vila, HomeTips |
| Bottom of wall cabinets, above the base line | 19.5 inches | Bob Vila, HomeTips |
| Bottom of wall cabinets, from the floor | 54 inches | The Home Depot, Lowe’s |
| Work surface clearance above the countertop | At least 15 inches (planning guideline) | NKBA Kitchen Planning Guidelines |
These heights fit standard-size cabinets. If yours are taller or shorter, or you plan a tall hood or a special backsplash, measure your actual cabinets before you draw a single line.

Find and mark the studs
Wall cabinets get heavy once you load them with plates and glasses, and drywall alone will not hold them. The Home Depot is direct about it: never attach heavy cabinetry solely to drywall.
- Use a stud finder and mark each stud with painter’s tape or a pencil, as The Home Depot and Bob Vila describe.
- Draw vertical centerlines. HomeTips says to mark studs above the wall-cabinet bottom line and at least 6 inches below it.
- Transfer the stud positions to the back of each cabinet. This Old House describes drilling holes through the cabinet back to line up with them.
- Do not assume how far apart your studs are. Check each one with your finder, because older houses and remodeled walls vary.
Before you drill
Wires and pipes can hide in kitchen walls. Turn off power and water to the areas you are working near, and drill only where you have checked. If you have questions about electrical or plumbing work, contact a licensed professional. Permit rules vary by city, so check with your local building department.
Hang the wall cabinets
Most guides start with the wall cabinets, including The Home Depot, Bob Vila and HomeTips. Working on uppers first means you are not leaning over base cabinets to reach the wall. Start with the corner cabinet, or the far-left unit if there is no corner.
Step 1: Set a temporary support rail
Mount a straight board on the wall with its top edge on the 54-inch line. Lowe’s uses a 1×4, HomeTips uses a 1×3 rail with three or four 2-inch screws, and Bob Vila recommends one cleat per cabinet and 2-inch screws. The rail holds the weight while you fasten. You remove it at the end.
Step 2: Drill the cabinet backs
Lowe’s says to drill through the back at the top, middle and bottom rails, with the top and bottom holes about 3/4 inch from the edge. The Home Depot uses two pilot holes per mounting rail, centered over studs.
Step 3: Lift, fasten and check
- With your helper, lift the cabinet onto the rail.
- Drive mounting screws into the studs. The Home Depot calls for 2 1/2-inch washer-head cabinet screws, and HomeTips says each cabinet needs at least three screws that reach at least 1 1/2 inches into the framing.
- Tighten just enough to hold, then check level and plumb. Lowe’s says to shim behind the cabinet at the stud lines if needed.
- Push gently on the cabinet to make sure it feels solid at every attachment point.
Step 4: Add the next cabinet
Line up the faces so the bottoms and fronts are even, clamp the two cabinets together, and fasten through the back into the studs. Then join the cabinets through their sides. This Old House uses 1 1/4-inch screws to join cabinets, and The Home Depot says to use trim-head screws in the hinge recesses on framed cabinets. Check level across the faces with a long level after each cabinet, and shim at the wall to align them.

| Where the guides differ | What the sources say | How to handle it |
|---|---|---|
| Screw type for hanging | This Old House uses 2 1/2-inch drywall screws with finishing washers; HomeTips says drywall screws are not strong enough and recommends cabinet screws; The Home Depot uses washer-head cabinet screws. | Use the screws your cabinet maker recommends. If there is no guidance, cabinet-rated screws are the safer pick. |
| Support rail | Lowe’s uses a 1×4; HomeTips uses a 1×3; The Home Depot uses temporary long screws in the studs. | Any straight, level, firmly fastened support works. Pick what you can set perfectly level. |
Set the base cabinets
Next come the base cabinets. HomeTips and Bob Vila both start with a corner or end base cabinet against the wall and add neighbors one at a time.
- Join them on the floor first, if it helps. This Old House lays base cabinets face up, clamps them together and joins them with 1 1/4-inch pan-head screws before setting them in place.
- Check the height against your line. This Old House says to compare the cabinet top to the countertop layout line and cut a filler strip to make up any difference.
- Level in both directions. HomeTips says base cabinets should be level front to back and side to side, and that lower cabinets should line up with the uppers.
- Shim, then fasten. Tap shims under the cabinet or behind it at the stud lines, then screw through the back into the studs. Bob Vila says to screw through the back at the top and bottom.
- Clamp each cabinet to its neighbor, check plumb, and then join them with screws.

Take your time here. Bob Vila points out that uneven cabinets can keep doors from closing and make drawers stick.
Fillers, doors and final checks
- Scribe the fillers. For an uneven wall, Lowe’s says to clamp a filler strip to the cabinet face, trace the wall with a compass, and cut along the line at a 7 to 10 degree bevel so it tucks against the wall.
- Remove the support rail. Take out the clamps and rail once everything is fastened, then patch the small screw holes, as Lowe’s describes.
- Hang doors and drawers last. HomeTips and Bob Vila both put doors, drawers and shelves at the end. Lowe’s adds that you should adjust the hinges until the doors sit evenly.
When the walls or studs do not cooperate
Real kitchens are rarely perfect. For anything structural, ask a licensed contractor.
- A bowed wall. Lowe’s says to glue shims over the stud lines where you will fasten, so the cabinet backs do not bow when you tighten the screws.
- Studs that do not match the cabinet. Bob Vila says you should ideally mount between two or more studs. If the cabinet does not span them, it describes a metal plate about 2 millimeters thick and 100 millimeters wide, fastened with two screws at the top and two at the bottom.
- Very few studs. Hunker describes backing the wall with 3/4-inch plywood long enough to span at least three studs, then fastening cabinets into the plywood. It also says that if you have less than one stud per cabinet, you should consider moving your cabinets or adding studs. The Home Depot adds that French cleats or toggle screws should only be used when the cabinet is also fastened to a stud.
Common mistakes and mental traps
- An unchecked first cabinet. Every cabinet after it follows the first one, so an error there repeats along the whole run.
- The sunk-cost trap. If a layout line looks off after two hours of work, it is easier to redo it than to live with it for years.
- Optimism about timelines. A guide that says “over one day” is telling you to plan for more. Book your helper for two days if you can.
- The “good enough” corner. A small gap at the corner grows as you add cabinets. Fix it while only one cabinet is on the wall.
What a pro installer costs
Hiring out is a fair choice, and knowing the range helps you judge a quote. HomeLight lists cabinet installers at $50 to $200 per linear foot, or $40 to $100 per hour, and handymen at $60 to $90 per hour or $55 to $85 per cabinet. Hunker gives a wider $50 to $250 per linear foot for labor.
Example (our estimate): for 20 linear feet of cabinets, the HomeLight per-foot range works out to roughly $1,000 to $4,000 in labor. Your total depends on your region, the layout and what the installer includes, so treat it as a planning number.
HomeLight also shares one itemized example: a semi-custom U-shaped kitchen with 13 cabinets had labor-related charges of $950 for cabinets, $250 for hardware and $300 for a trip charge. A cabinet specialist quoted there says installation for stock and custom cabinets is close to the same. Ask each installer whether the quote covers hardware, trim and cleanup, and get it in writing. For the cabinet side of the budget, read how the four cabinet types compare on price.
Final checklist before you call it done
- ☐Every cabinet is screwed into studs, or into proper backing if studs did not line up
- ☐Each cabinet is level front to back and side to side, and plumb
- ☐Neighboring cabinets are clamped and joined, with even faces
- ☐Fillers are scribed to the wall, rails are out and screw holes are patched
- ☐Doors close fully, drawers glide and door gaps look even
Frequently asked questions
Do I install wall cabinets or base cabinets first?
Most of the guides cited here start with wall cabinets, including The Home Depot, Bob Vila and HomeTips. Working top-down keeps the base cabinets from getting in your way.
How high do you hang kitchen wall cabinets?
For standard cabinets, The Home Depot and Lowe’s set the bottom edge at 54 inches from the floor. Bob Vila puts it 19.5 inches above a 34.5-inch base line, measured from the highest floor point.
What screws should I use to hang kitchen cabinets?
Sources vary. The Home Depot uses 2 1/2-inch washer-head cabinet screws, and HomeTips says drywall screws are not strong enough and asks for at least three screws reaching 1 1/2 inches into the framing. Follow your cabinet maker’s instructions first.
Can one person install kitchen cabinets alone?
It is risky. Bob Vila warns of muscle strain and crushing injuries when lifting alone. Its second guide says cleats become necessary if you try to hang cabinets without a second person, and recommends one per cabinet unit.
How much does it cost to have kitchen cabinets installed?
HomeLight lists cabinet installers at $50 to $200 per linear foot. Local quotes vary, so ask for itemized estimates. If you are still buying, see answers to common ordering questions first.
Final thoughts
Installing kitchen cabinets is mostly careful measuring, steady fastening and constant checking. If you take the layout seriously, find your studs, and keep the level in your hand, the rest follows. Get a helper, take breaks, and expect to adjust.
When you are ready to choose cabinets, you can compare options and sizes on the site. If a step feels beyond your comfort level, hiring a pro for that part is a sensible call, not a failure.
Planning your cabinet project?
Compare styles and sizes, then ask for help with your layout before you order.


